Discuss Scratch
- Discussion Forums
- » Help with Scripts
- » ITopic: Want to make 3D? Click here!
![[RSS Feed]](//cdn.scratch.mit.edu/scratchr2/static/__74e70580e9dbe93ce1c3f8422dde592d__//djangobb_forum/img/feed-icon-small.png "[RSS Feed]")
- ProdigyZeta7
-
 Scratcher

1000+ posts
ITopic: Want to make 3D? Click here!
Remember, if you don't understand the concepts behind 3D programming, don't worry about it! You will first need to learn a lot of complex math stuff before you can dig right into 3D.
For your benefit, I have compiled the ultimate list of great sources for learning 3D programming in Scratch. Depending on what type of 3D you're going for, you will want to research the algorithms for transforming points, plotting on screen, and other fundamental concepts. If you still don't know how something is done, take a look at the examples provided with every category.
GENERAL 3D CONCEPTS
Parallax Scrolling (Pseudo-3D)
A great way to introduce 3D concepts is to start with pseudo-3D. This is the easiest form of 3D because it requires no trigonometry: only a few common operations and 3D is accomplished! However, the severe disadvantage of this is that you are unable to view the camera in a direction other than straight forward.
So here's how parallax 3D works:
define go to x: (x pos) y: (y pos) z: (z pos)And here's how you would make objects appear bigger as they get closer or smaller as they get farther away:
set [x difference v] to ((x pos) - (my x position))
set [y difference v] to ((y pos) - (my y position))
set [z difference v] to ((z pos) - (my z position))
set [X position on screen v] to ((ViewMultiplier) * ((x difference) / (z difference)))
set [Y position on screen v] to ((ViewMultiplier) * ((y difference) / (z difference)))
set size to ((SizeMultiplier) * ((ViewMultiplier) / (z difference)))It works because as you move left objects move right and vice versa, and as you forward objects get closer and vice versa. The ViewMultiplier variable can be any positive number: This tells how “zoomed” in you are, so a good value would be 240 (to match the farthest x coordinate). This would work best if you wanted to make a background that scrolls ‘slower’ than the rest of the environment to give it that feeling of depth.
set pen size to ((SizeMultiplier) * ((ViewMultiplier) / (z difference)))
Here are some notable examples of parallax scrolling and pseudo-3D:
- 3D Spinning Starfield by ProdigyZeta7
- Pi Invaders by ProdigyZeta7
- 3D Shape Runner 2 by ProdigyZeta7
- Slingshot Engine by ProdigyZeta7
- Full 16 Frame Walk Cycle by griffpatch
- 3D Ripples by GreenConsole
Orbital 3D
The most common 3D projects you see probably go under this category. It's called orbital because the points, not the camera, appear to revolve around a central spot. This is more advanced than pseudo-3D because of the trigonometry involved, but once you learn, understand, and master it your comprehension of other 3D methods become much clearer and stronger.
So to begin, I want you to take a look at sine, cosine, and tangent, to realize what we're going to do. @boaz4 has created an excellent tutorial on the subject, and the following code will be based on his.
define direction (part1) , (part2) //This calculates the direction to a point as if it were on the screen“Horizontal angle” and “Vertical angle” are the rotations applied to the point. In that script the points retain their original coordinates, instead of updating their position to the new coordinates as demonstrated by boaz4.
if <(part2) = [0]> then //if the point is only on the x-axis
if <(part1) < [0]> then //if the point is to the left of the x-axis
point in direction (-90 v)
else
point in direction (90 v)
end
else
point in direction ([atan v] of ((part1) / (part2)) //Use trigonometry to find the direction
if <(part2) < [0]> then //if the point is below the x-axis, then face the other way
turn cw (180) degrees
end
end
define length (part1) , (part2)
set [length v] to ([sqrt v] of (((part1) * (part1)) + ((part2) * (part2)))) //uses the distance formula
define go to x: (x pos) y: (y pos) z: (z pos)
direction (x pos) , (z pos) //direction to the point in the XZ plane
length (x pos) , (z pos) //distance to the point in the XZ plane
set [Screen X v] to ((length) * ([sin v] of ((direction) + (horizontal angle))))
set [Screen Z v] to ((length) * ([cos v] of ((direction) + (horizontal angle))))
direction (y pos) , (Screen Z) //direction to the point in the new YZ plane
length (y pos) , (Screen Z) //distance to the point in the new YZ plane
set [Screen Y v] to ((length) * ([sin v] of ((direction) + (vertical angle))))
set [Screen Z v] to ((length) * ([cos v] of ((direction) + (vertical angle))))
go to x: (Screen X) y: (Screen Y)
And for those who need it, a smorgasbord of examples!
- Warp Field 3D by ProdigyZeta7
- 3D Balls in Cube by ProdigyZeta7
- Playable 3D Rubik's Cube by boaz4
- 3D Human Wireframe! by boaz4
- 3D Soccer Ball by boaz4
- Point-Based 3D Filled Cube by TiberiumFusion
- 3D Block Renderer 1.1 by CodeLegend
If you are really wanting to delve into the advanced kind of 3D, this is the subject. I call it transformation 3D because it relies on a transformation matrix which makes rotating objects and the camera possible.
In Scratch, the rotation matrix varies among those who use it. I'll be showing my version of 3D:
define calculate transformation matrix (horiz) (vert)However, one challenge you should keep in mind is that this transformation matrix works for the camera, but when rotating objects the angles should be reversed to compensate for the irregularity with the matrix.
set [Xaxis.x v] to ([cos v] of (horiz)
set [Xaxis.y v] to [0]
set [Xaxis.z v] to ((-1) * ([sin v] of (horiz)))
set [Yaxis.x v] to ((-1) * (([sin v] of (horiz)) * ([sin v] of (vert)))
set [Yaxis.y v] to ([cos v] of (vert)
set [Yaxis.z v] to ((-1) * (([cos v] of (horiz)) * ([sin v] of (vert)))
set [Zaxis.x v] to (([sin v] of (horiz)) * ([cos v] of (vert))
set [Zaxis.y v] to ([sin v] of (vert)
set [Zaxis.z v] to (([cos v] of (horiz)) * ([cos v] of (vert))
define transform point x:(x) y:(y) z:(z) //Apply transformation matrix to point
set [new x v] to (((x) * (Xaxis.x)) + (((y) * (Yaxis.x)) + ((z) * (Zaxis.x))))
set [new y v] to (((x) * (Xaxis.y)) + (((y) * (Yaxis.y)) + ((z) * (Zaxis.y))))
set [new z v] to (((x) * (Xaxis.z)) + (((y) * (Yaxis.z)) + ((z) * (Zaxis.z))))
In all cases of 3D, there are challenges you should be aware of:
- Rendering surfaces @Jamohyperturbpro's triangle filling script is the fastest there is.
- Sorting surfaces Research which sorting algorithm works best for you: bubble sort, insertion sort, merge sort, selection sort…
- Clipping Without eliminating points behind the camera, rendering looks inverted and very awkward. Make sure you render only points whose transformed coordinates are in front of the camera and are within view.
- Speed DadOfMrLog said that the fewer blocks and variables you use, the faster your program works. Sometimes recalculating something can be faster than storing it to a variable and reading it when performing operations.
- Easy to Use While 3D projects are complex on the inside, they should not be complex on the outside. Figure out which controls work best for the program (arrow keys or WASD?) and always indicate if any other controls are used that could benefit the user (e.g. press L to reduce lag).
These studios contain 3D projects of all sorts that I think you will benefit from:
- http://scratch.mit.edu/studios/252458
- http://scratch.mit.edu/studios/201680
- http://scratch.mit.edu/studios/535837
- http://scratch.mit.edu/studios/347956
- http://scratch.mit.edu/studios/392688/
ALTERNATIVE 3D CONCEPTS
Ray casting
Ray casting is a fast method of drawing the environment using a 2D grid and what is known as the Digital Differential Analyzer. It plots vertical strips along each x position, and the size of each strip represents the distance to a wall or object when facing that direction. Ray-casting is essentially casting a ray until you've hit a wall. The disadvantages of using ray-casting is that you can only rotate left and right, and that overhangs are usually impossible because of the limitations of 2D grids (however, griffpatch has shown that overhangs are possible!). I don't feel like reinventing the wheel, so if you would like to see a more in-depth look at ray-casting techniques and its implementation in computer code, see this awesome document.
Here are some excellent examples of ray casting on Scratch:
- 3D Maze Escape by CrazyLegs66
- 3D RayCaster by tylerbata
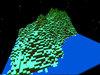
- 3D-LANDSCAPE by tylerbata
- 3D Maze by griffpatch
- Textured 3D RayCaster by eRKSToCK
- 3D raycasting maze by PianoApprentice
Ray tracing
Don't get this mixed up with ray casting. Ray tracing is a slow technique, but makes incredibly realistic and detailed scenes. For every pixel on the screen, the program “shoots” a ray into the world of objects and determines where the closest intersection occurs, if there is one. The ray is then reflected off the object at the intersection and again “shoots” into the scene. This is repeated for a set amount of times or until the ray doesn't hit an object, and depending on what objects it hits a color is assigned to that pixel. The detail of ray-tracing depends on many factors: phong, diffuse, and ambient lighting; radiosity, reflection, and refraction; resolution, field of view, and limits to additional ray-tracings. Because Scratch is not as powerful as other languages, ray tracing is extremely slow, and is not recommended if you aren't patient about it.
For a step-by-step introduction to ray tracing, @Canthiar has done an awesome job of making a studio for ray tracing tutorials.
And if you are curious, I'm creating a powerful recursive ray tracer as well.

3D Physics
For some, making physics simulations in 3D is awesome, but it requires extensive knowledge of the subject. A handful of Scratchers, including myself, have successfully made physics simulations in 3D. However, this has some major impact in performance such that in addition to transforming and rendering the points there is the issue of allocating just enough processing power to complete the physics calculations in the same frame. It is a good idea to include physics to really impress people, but not if you're looking for a speedy performance.
These are a select few examples of physics and collision in 3D:
- 3D Object Physics by ProdigyZeta7
- Ocean Simulator by ProdigyZeta7
- O by DCPU-16
- Kart Collision Test by DCPU-16
- Polygon Soup by DCPU-16
Well that wraps up the lesson on 3D. If you have any questions or concerns about issues I didn't cover yet, please let me know and I will add to this post.
Last edited by Harakou (Jan. 31, 2016 05:09:25)

- cheeseeater
-
 Scratcher

1000+ posts
ITopic: Want to make 3D? Click here!
Wow, thanks for taking the time to make this, it should be very helpful! If I ever decide to make a 3D project then I will come here for info. 

Last edited by cheeseeater (Oct. 21, 2014 06:52:19)
- ProdigyZeta7
-
Scratcher
1000+ posts
ITopic: Want to make 3D? Click here!
Bump. So glad I found this gem again. It's definitely one of my best posts.
I'm wondering if I should move this to Advanced Topics.
I'm wondering if I should move this to Advanced Topics.
- drmcw
-
 Scratcher

1000+ posts
ITopic: Want to make 3D? Click here!
Bump. So glad I found this gem again. It's definitely one of my best posts.Wiki?
I'm wondering if I should move this to Advanced Topics.
- MrSherlockHolmes
-
 Scratcher

500+ posts
ITopic: Want to make 3D? Click here!
Bump. So glad I found this gem again. It's definitely one of my best posts.Best post ever! Well done
I'm wondering if I should move this to Advanced Topics.

Centred signature.


- FratilaCAT
-
 Scratcher

1 post
ITopic: Want to make 3D? Click here!
Thank you so much for making this i'm putting it into my project

<[chicken] = [life]>
- nathan_13
-
 Scratcher

29 posts
ITopic: Want to make 3D? Click here!
Thanks for reminding me on how to make 3D
Mine works by size for the z coordinate
Mine works by size for the z coordinate
Last edited by Paddle2See (Jan. 10, 2016 19:57:26)
define awesome (scratcher)
set [me v] to (scratcher)

when green flag clicked
awesome (me)
- flamer99
-
 Scratcher

1 post
ITopic: Want to make 3D? Click here!
Thanks for the AWESOME tutorial, some of them out there aren't too descriptive  .
.
 .
.- GreenAndBlackCat9000
-
 Scratcher

1 post
ITopic: Want to make 3D? Click here!
cool i made somthing with it https://scratch.mit.edu/projects/68461210/
- ilikelegos
-
 Scratcher

100+ posts
ITopic: Want to make 3D? Click here!
Great tutorial! 

Hi! I'm a computer science student who learned coding on Scratch!
- chuckdaboss
-
 Scratcher

100+ posts
ITopic: Want to make 3D? Click here!
soo many necros!!!!!!
 CHUCK Gotta go fast The 60 sec rule prevents me from going fast.
 <–click to play


- Generalbiff_
-
 Scratcher

100+ posts
ITopic: Want to make 3D? Click here!
…how would I texture this? https://scratch.mit.edu/projects/67361480/ I've been trying since I released it which I think was about 1 year and 2 days ago in fact  please help.
 please help.
when green flag clicked
forever
    subscribe to AACannonProductions on youtube!
end
- cuddley
-
 Scratcher
100+ posts
ITopic: Want to make 3D? Click here!
…how would I texture this? https://scratch.mit.edu/projects/67361480/ I've been trying since I released it which I think was about 1 year and 2 days ago in factIt will be very very very slow… Are you sure?please help.
 please help.
Generation 3: the first time you see this copy and paste it on top of your sig in the scratch forums and increase generation by 1. Social experiment.
I don't know what to write.
- cuddley
-
Scratcher
100+ posts
ITopic: Want to make 3D? Click here!
how do you get z positions?What do you mean? Set the Z value?
Generation 3: the first time you see this copy and paste it on top of your sig in the scratch forums and increase generation by 1. Social experiment.
I don't know what to write.
- Eruptor2009
-
 Scratcher

83 posts
ITopic: Want to make 3D? Click here!
<key [O] pressed?>
<key [M] pressed?>
<key [G] pressed?>
- deck26
-
 Scratcher

1000+ posts
ITopic: Want to make 3D? Click here!
Please don't spam or necropost.<key [O] pressed?>
<key [M] pressed?>
<key [G] pressed?>
- tigercake123
-
 Scratcher

10 posts
ITopic: Want to make 3D? Click here!
Remember, if you don't understand the concepts behind 3D programming, don't worry about it! You will first need to learn a lot of complex math stuff before you can dig right into 3D.
For your benefit, I have compiled the ultimate list of great sources for learning 3D programming in Scratch. Depending on what type of 3D you're going for, you will want to research the algorithms for transforming points, plotting on screen, and other fundamental concepts. If you still don't know how something is done, take a look at the examples provided with every category.GENERAL 3D CONCEPTS
Parallax Scrolling (Pseudo-3D)
A great way to introduce 3D concepts is to start with pseudo-3D. This is the easiest form of 3D because it requires no trigonometry: only a few common operations and 3D is accomplished! However, the severe disadvantage of this is that you are unable to view the camera in a direction other than straight forward.
So here's how parallax 3D works:define go to x: (x pos) y: (y pos) z: (z pos)And here's how you would make objects appear bigger as they get closer or smaller as they get farther away:
set [x difference v] to ((x pos) - (my x position))
set [y difference v] to ((y pos) - (my y position))
set [z difference v] to ((z pos) - (my z position))
set [X position on screen v] to ((ViewMultiplier) * ((x difference) / (z difference)))
set [Y position on screen v] to ((ViewMultiplier) * ((y difference) / (z difference)))set size to ((SizeMultiplier) * ((ViewMultiplier) / (z difference)))It works because as you move left objects move right and vice versa, and as you forward objects get closer and vice versa. The ViewMultiplier variable can be any positive number: This tells how “zoomed” in you are, so a good value would be 240 (to match the farthest x coordinate). This would work best if you wanted to make a background that scrolls ‘slower’ than the rest of the environment to give it that feeling of depth.
set pen size to ((SizeMultiplier) * ((ViewMultiplier) / (z difference)))
Here are some notable examples of parallax scrolling and pseudo-3D:
- 3D Spinning Starfield by ProdigyZeta7
- Pi Invaders by ProdigyZeta7
- 3D Shape Runner 2 by ProdigyZeta7
- Slingshot Engine by ProdigyZeta7
- Full 16 Frame Walk Cycle by griffpatch
- 3D Ripples by GreenConsole
Orbital 3D
The most common 3D projects you see probably go under this category. It's called orbital because the points, not the camera, appear to revolve around a central spot. This is more advanced than pseudo-3D because of the trigonometry involved, but once you learn, understand, and master it your comprehension of other 3D methods become much clearer and stronger.
So to begin, I want you to take a look at sine, cosine, and tangent, to realize what we're going to do. @boaz4 has created an excellent tutorial on the subject, and the following code will be based on his.define direction (part1) , (part2) //This calculates the direction to a point as if it were on the screen“Horizontal angle” and “Vertical angle” are the rotations applied to the point. In that script the points retain their original coordinates, instead of updating their position to the new coordinates as demonstrated by boaz4.
if <(part2) = [0]> then //if the point is only on the x-axis
if <(part1) < [0]> then //if the point is to the left of the x-axis
point in direction (-90 v)
else
point in direction (90 v)
end
else
point in direction ([atan v] of ((part1) / (part2)) //Use trigonometry to find the direction
if <(part2) < [0]> then //if the point is below the x-axis, then face the other way
turn cw (180) degrees
end
end
define length (part1) , (part2)
set [length v] to ([sqrt v] of (((part1) * (part1)) + ((part2) * (part2)))) //uses the distance formula
define go to x: (x pos) y: (y pos) z: (z pos)
direction (x pos) , (z pos) //direction to the point in the XZ plane
length (x pos) , (z pos) //distance to the point in the XZ plane
set [Screen X v] to ((length) * ([sin v] of ((direction) + (horizontal angle))))
set [Screen Z v] to ((length) * ([cos v] of ((direction) + (horizontal angle))))
direction (y pos) , (Screen Z) //direction to the point in the new YZ plane
length (y pos) , (Screen Z) //distance to the point in the new YZ plane
set [Screen Y v] to ((length) * ([sin v] of ((direction) + (vertical angle))))
set [Screen Z v] to ((length) * ([cos v] of ((direction) + (vertical angle))))
go to x: (Screen X) y: (Screen Y)
And for those who need it, a smorgasbord of examples!Transformation 3D
- Warp Field 3D by ProdigyZeta7
- 3D Balls in Cube by ProdigyZeta7
- Playable 3D Rubik's Cube by boaz4
- 3D Human Wireframe! by boaz4
- 3D Soccer Ball by boaz4
- Point-Based 3D Filled Cube by TiberiumFusion
- 3D Block Renderer 1.1 by CodeLegend
If you are really wanting to delve into the advanced kind of 3D, this is the subject. I call it transformation 3D because it relies on a transformation matrix which makes rotating objects and the camera possible.
In Scratch, the rotation matrix varies among those who use it. I'll be showing my version of 3D:define calculate transformation matrix (horiz) (vert)However, one challenge you should keep in mind is that this transformation matrix works for the camera, but when rotating objects the angles should be reversed to compensate for the irregularity with the matrix.
set [Xaxis.x v] to ([cos v] of (horiz)
set [Xaxis.y v] to [0]
set [Xaxis.z v] to ((-1) * ([sin v] of (horiz)))
set [Yaxis.x v] to ((-1) * (([sin v] of (horiz)) * ([sin v] of (vert)))
set [Yaxis.y v] to ([cos v] of (vert)
set [Yaxis.z v] to ((-1) * (([cos v] of (horiz)) * ([sin v] of (vert)))
set [Zaxis.x v] to (([sin v] of (horiz)) * ([cos v] of (vert))
set [Zaxis.y v] to ([sin v] of (vert)
set [Zaxis.z v] to (([cos v] of (horiz)) * ([cos v] of (vert))
define transform point x:(x) y:(y) z:(z) //Apply transformation matrix to point
set [new x v] to (((x) * (Xaxis.x)) + (((y) * (Yaxis.x)) + ((z) * (Zaxis.x))))
set [new y v] to (((x) * (Xaxis.y)) + (((y) * (Yaxis.y)) + ((z) * (Zaxis.y))))
set [new z v] to (((x) * (Xaxis.z)) + (((y) * (Yaxis.z)) + ((z) * (Zaxis.z))))
In all cases of 3D, there are challenges you should be aware of:
- Rendering surfaces @Jamohyperturbpro's triangle filling script is the fastest there is.
- Sorting surfaces Research which sorting algorithm works best for you: bubble sort, insertion sort, merge sort, selection sort…
- Clipping Without eliminating points behind the camera, rendering looks inverted and very awkward. Make sure you render only points whose transformed coordinates are in front of the camera and are within view.
- Speed DadOfMrLog said that the fewer blocks and variables you use, the faster your program works. Sometimes recalculating something can be faster than storing it to a variable and reading it when performing operations.
- Easy to Use While 3D projects are complex on the inside, they should not be complex on the outside. Figure out which controls work best for the program (arrow keys or WASD?) and always indicate if any other controls are used that could benefit the user (e.g. press L to reduce lag).
These studios contain 3D projects of all sorts that I think you will benefit from:
- http://scratch.mit.edu/studios/252458
- http://scratch.mit.edu/studios/201680
- http://scratch.mit.edu/studios/535837
- http://scratch.mit.edu/studios/347956
- http://scratch.mit.edu/studios/392688/
ALTERNATIVE 3D CONCEPTS
Ray casting
Ray casting is a fast method of drawing the environment using a 2D grid and what is known as the Digital Differential Analyzer. It plots vertical strips along each x position, and the size of each strip represents the distance to a wall or object when facing that direction. Ray-casting is essentially casting a ray until you've hit a wall. The disadvantages of using ray-casting is that you can only rotate left and right, and that overhangs are usually impossible because of the limitations of 2D grids (however, griffpatch has shown that overhangs are possible!). I don't feel like reinventing the wheel, so if you would like to see a more in-depth look at ray-casting techniques and its implementation in computer code, see this awesome document.
Here are some excellent examples of ray casting on Scratch:
- 3D Maze Escape by CrazyLegs66
- 3D RayCaster by tylerbata
- 3D-LANDSCAPE by tylerbata
- 3D Maze by griffpatch
- Textured 3D RayCaster by eRKSToCK
- 3D raycasting maze by PianoApprentice
Ray tracing
Don't get this mixed up with ray casting. Ray tracing is a slow technique, but makes incredibly realistic and detailed scenes. For every pixel on the screen, the program “shoots” a ray into the world of objects and determines where the closest intersection occurs, if there is one. The ray is then reflected off the object at the intersection and again “shoots” into the scene. This is repeated for a set amount of times or until the ray doesn't hit an object, and depending on what objects it hits a color is assigned to that pixel. The detail of ray-tracing depends on many factors: phong, diffuse, and ambient lighting; radiosity, reflection, and refraction; resolution, field of view, and limits to additional ray-tracings. Because Scratch is not as powerful as other languages, ray tracing is extremely slow, and is not recommended if you aren't patient about it.
For a step-by-step introduction to ray tracing, @Canthiar has done an awesome job of making a studio for ray tracing tutorials.
And if you are curious, I'm creating a powerful recursive ray tracer as well.
3D Physics
For some, making physics simulations in 3D is awesome, but it requires extensive knowledge of the subject. A handful of Scratchers, including myself, have successfully made physics simulations in 3D. However, this has some major impact in performance such that in addition to transforming and rendering the points there is the issue of allocating just enough processing power to complete the physics calculations in the same frame. It is a good idea to include physics to really impress people, but not if you're looking for a speedy performance.
These are a select few examples of physics and collision in 3D:
- 3D Object Physics by ProdigyZeta7
- Ocean Simulator by ProdigyZeta7
- O by DCPU-16
- Kart Collision Test by DCPU-16
- Polygon Soup by DCPU-16
Well that wraps up the lesson on 3D. If you have any questions or concerns about issues I didn't cover yet, please let me know and I will add to this post.

uhh… what are the red blocks?
- Discussion Forums
- » Help with Scripts
-
» ITopic: Want to make 3D? Click here!